Physical Address
304 North Cardinal St.
Dorchester Center, MA 02124
Physical Address
304 North Cardinal St.
Dorchester Center, MA 02124

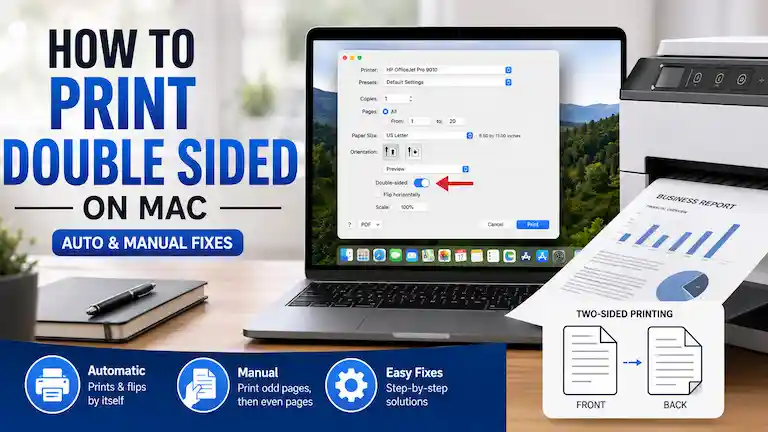
Figuring out exactly how to print double sided on mac shouldn’t be stressful, but it often is. I recently printed a 40-page report for a client and walked away to grab a coffee. I expected a nice, neat stack of paper when I got back. Instead, the printer spit out 40 single-sided pages. It wasted a lot of ink and paper.
If you work from home or set up your own tech, you probably know this feeling. You have a Mac and a good printer, but the “Two-Sided” button is either missing, grayed out, or just not working.
Whether you are printing long documents, school papers, or standard work reports, getting your Mac to print on both sides (also called duplex printing) is a great trick to know. Let’s get it fixed.
Tested For Accuracy: All steps in this guide were tested by the author on macOS Sonoma 14.5, macOS Ventura 13.6, and macOS Monterey 12.7 using both HP and Brother printers.
Your Mac needs extra software (called drivers) to talk to outside printer brands like HP, Canon, Brother, and Epson. Sometimes, your Mac simply doesn’t know that your printer can print on both sides.
When your Mac is confused, it plays it safe. It prints on one side only to stop the paper from jamming up. The good news is that you can fix this in less than a minute.
If you bought your printer in the last few years, it probably flips the paper by itself. The steps to turn this on depend on how old your Mac’s software is.
Apple recently changed the print screen to look a lot like an iPhone menu.
(Brand Note: Some printers have specific quirks. For example, Epson EcoTank users often need to select ‘Two-Sided Printing Settings’ from a dedicated Printer Options menu).
If you have an older Mac, your print menu is a small box that hides the best settings.
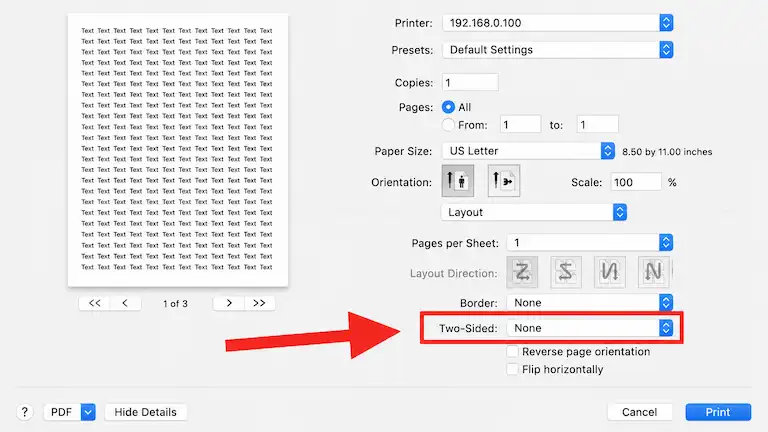
When you pick two-sided printing, your Mac might ask you to choose a binding edge. If you guess wrong, half of your pages will print upside down.
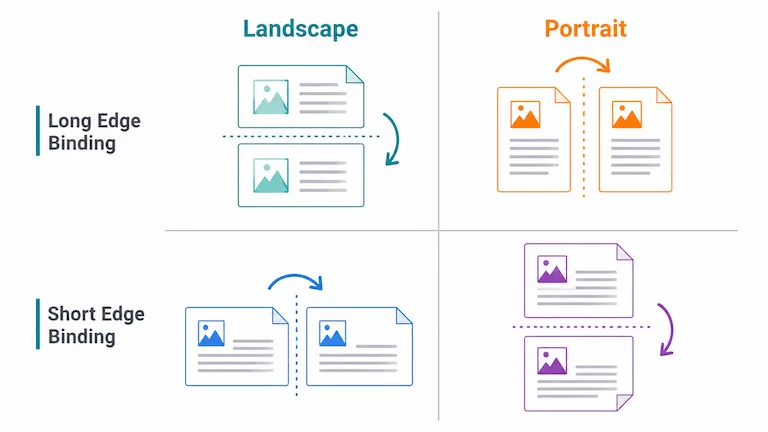
| Binding Type | How it Flips | Best Used For |
| Long-Edge Binding | Flips along the long side, exactly like a standard hardcover book. | Standard tall documents (essays, reports, letters). |
| Short-Edge Binding | Flips over the top edge, like a legal notepad or a wall calendar. | Wide documents (landscape mode), spreadsheets, or big charts. |
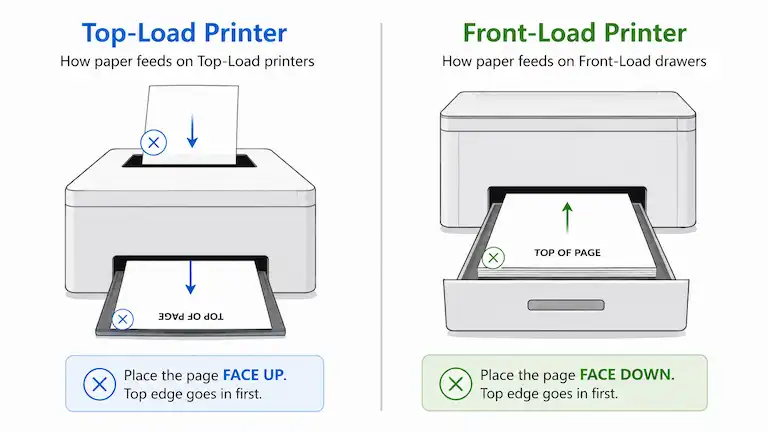
Let’s go back to that 40-page client report. The printer I was using was just too old to flip the paper itself. If the “Two-Sided” option is completely missing from your Mac, you have to flip the paper with your own hands.
Do not just guess how to put the paper back in. Manual printing cannot safely use one universal rule because feed directions vary wildly by printer design. HP, Canon, and Brother all pull paper differently. Do this quick test first:
A missing or unavailable double-sided option does not always mean something is broken. The cause can be the printer’s hardware capability, its detected configuration, the selected printer software, or the app you are printing from. Let’s fix it.
macOS often installs a basic driver that leaves the advanced features turned off.
If your printer supports automatic duplexing but the option is missing, check whether macOS actually detected the capability. Some printer models expose extra features through manufacturer software, while others provide the same capability through AirPrint.
If the first two fixes fail, your Mac’s printing data might be stuck.
Most basic tech blogs skip this step. If nothing else works, you can adjust settings using Apple’s hidden printing system, called CUPS. (Note: This is an advanced troubleshooting method, not the normal solution).
cupsctl WebInterface=yes (Note: You might need to type your Mac admin password to allow this).localhost:631 into the address bar. Press Enter. (Pro tip: Insert a screenshot of the CUPS interface here).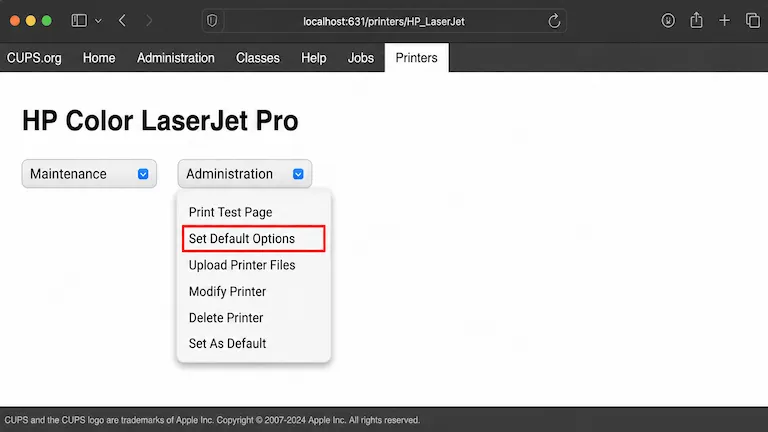
You do not want to click through all these menus every time you print. You can save your perfect settings as a Preset.
The steps above work great for most apps, but some popular programs hide the print settings in weird places.
Preview is the default PDF reader on Mac.
Word loves to hide settings behind its own menu layout.
Depending on the browser and print dialog, Google Docs may initially show browser-specific print options.
| What went wrong? | Why it happened | How to fix it |
| Paper jammed during manual flip | Pages stick together because of static electricity or wet ink. | Fan the pages with your thumb before putting them back in the tray. Wait 30 seconds to let the ink dry first. |
| Margins are cut off | The printer thinks you are using A4 paper instead of standard US Letter. | Look for the “Scale” setting in the print window. Change it to “Fit to Printable Area.” |
| Pages are upside down | You picked the wrong binding edge. | Go back to Layout settings. Change “Short-Edge” to “Long-Edge” (or the other way around). |
Microsoft Word places its own print layout over the Mac system settings. To find it, press Command + P, and look closely for the “Layout” tab (on older Macs, you have to click the “Copies & Pages” dropdown to find Layout). If it is totally missing, try clicking the button to use the system print dialog instead, or make sure your Word app is fully updated.
If your Mac is set up correctly but the printer refuses to flip the paper, the feature might be turned off inside the printer’s own internal motherboard. To fix this, open your web browser, type your printer’s IP address into the top bar, and press enter. This opens the printer’s secret control panel. Go to Printer Settings > System, find the “Duplex Printing” switch, and turn it on.
Web browsers have their own basic print screens that often hide extra settings. If the double-sided button is missing, don’t try to print straight from the web page. Instead, download the PDF to your Mac. Open that saved file using Apple’s Preview app. When you hit Print from there, your missing button will show up again.
Apple’s AirPrint is fast, but it doesn’t always load every feature for every printer. If the two-sided option is missing, your Mac just didn’t see it. To fix this, go to System Settings > Printers & Scanners and delete your printer. Then, click “Add Printer.” But this time, click Select Software… and choose your printer’s real brand name (like HP Color LaserJet) instead of AirPrint. That should bring the button back.
Need more help with your hardware? Browse our full library of Error Fixes & Diagnostics for more step-by-step system guides.
About the Author: Bijoy Pal is a tech writer, publisher, and macOS specialist. Instead of guessing, he researches every issue deeply and tests solutions hands-on with real hardware before publishing. Bijoy focuses on giving readers simple, tested fixes without confusing jargon. Connect with him on LinkedIn or explore more guides at sysresolve.com.


[…] up your home office? Learn the fastest manual and automatic fixes for how to print double-sided on Mac if your printer settings are […]